Property photography like any other photography is a skill. Pro or not there are some very basic mistakes you can avoid with some simple tips to maximise the chances of your property photos attracting potential buyers and selling your properties faster on the online portals.
The mistakes we’re going to cover here are sometimes more subtle; they therefore occur much more frequently in estate agent photos.
Hopefully, some of the more obvious mistakes are ones you can avoid without our help!
To avoid mistakes like the one above and all those in this blog, check out our Ultimate Guide to Property Photography For Estate Agents.
Dark Photos
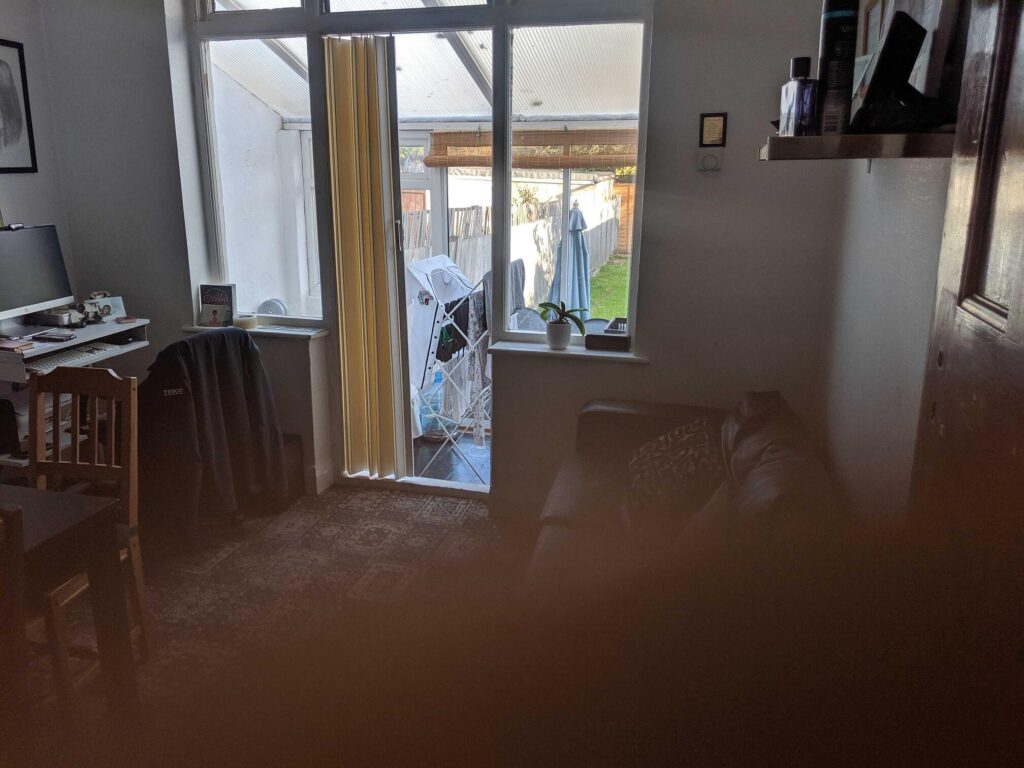
This is probably the most common mistake as its impossible to manage natural light and managing it using your DSLR camera settings or a flash is a particularly complicated endeavour.
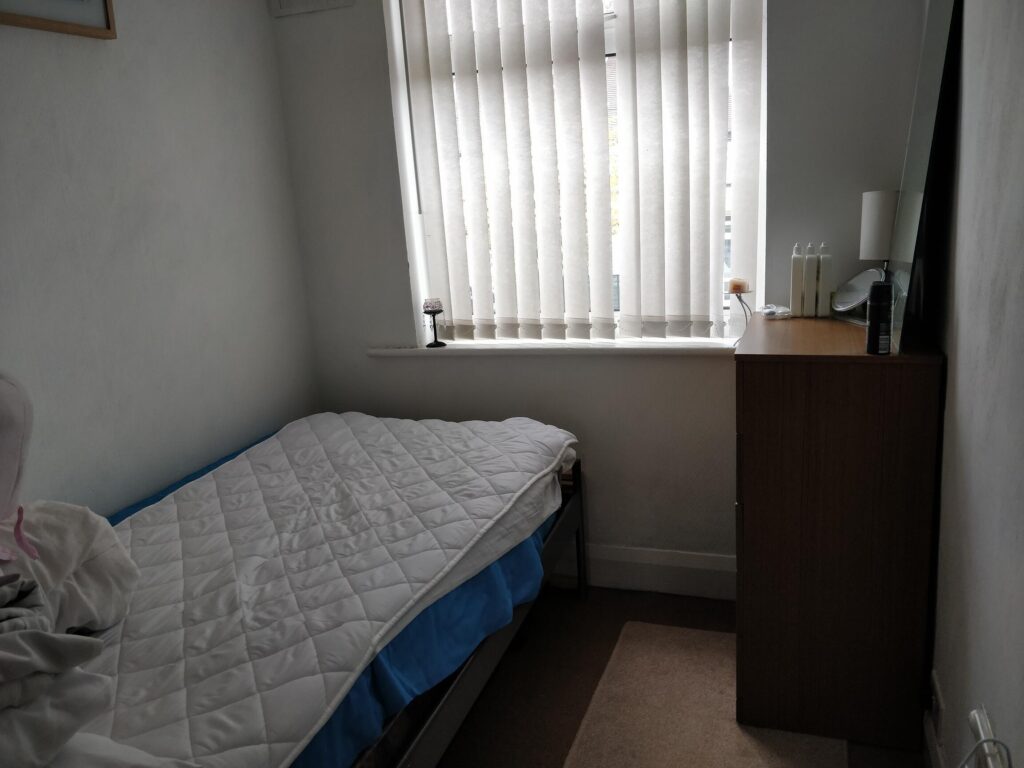
The biggest issue here is that the photographer has left the blinds closed. The result is an uninspiring photo that doesn’t given any sense of this bedroom space and doesn’t help the buyer happily visualise themselves in it.
Photos with poor lighting whether they’re too dark or overexposed due to having too much light do not encourage people to click into your online listings or book viewings.
How Could The Photo Have Been Better?
- The blinds should have been opened.
- The camera settings should be adjusted to take interior photography
- The photo should have been professionally edited with Colour Correction.
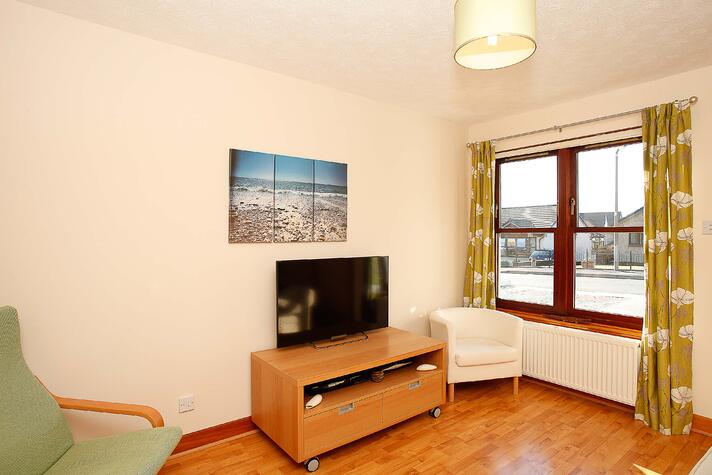
Bad Angles
This is another subtle mistake but one that negatively impacts the viewer’s perception of the property.
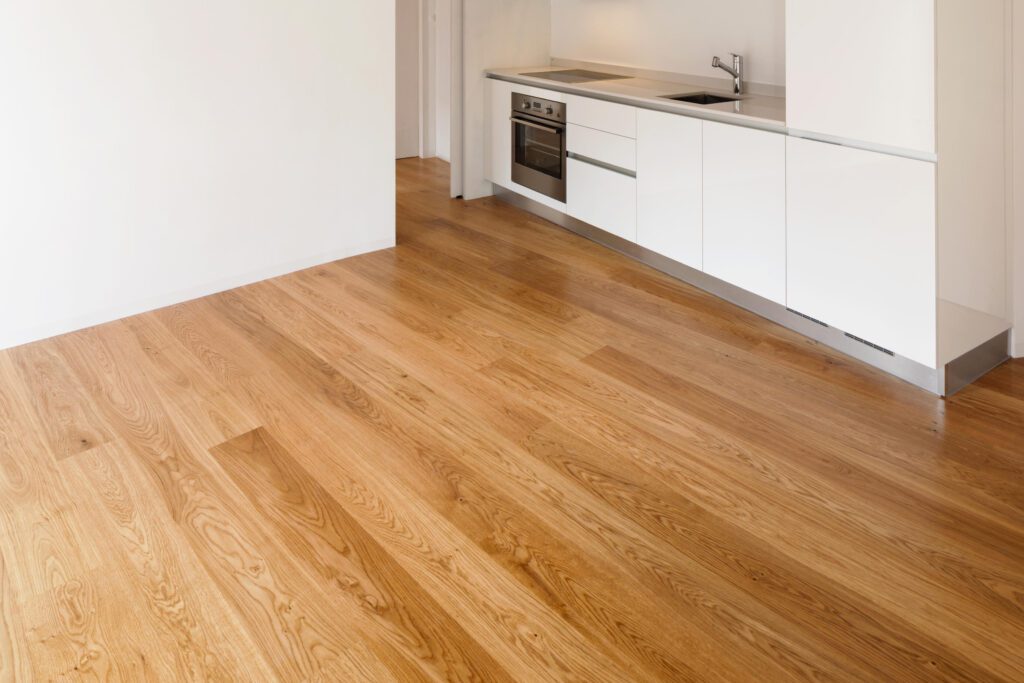
There are a few issues with the angles in this photo:
- The camera is pointing downwards meaning you see too much floor.
- The camera is not positioned at the right height which makes the photo imbalanced and less attractive to the eye.
How Could The Photo Have Been Better?
- The camera should have been positioned straight, facing forward. Using a spirit bubble can help ensure that your camera is always straight.
- A tripod should have been used to set the camera at the correct height. A good height for kitchen photography is around 5.5ft (1.5m) off the ground. Find out more about the best tripod for property photography here.
- The camera should be placed in a corner so that you can get 3 walls in the frame. If the space you are shooting is large enough, you can try a head on shot.
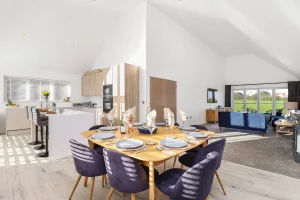
A Better Example:
In comparison, this photo by one of our Focal Pros, demonstrates great angles. This interior property photography feels natural and inviting as it offers a more realistic perspective of the space.
Poor Property Preparation
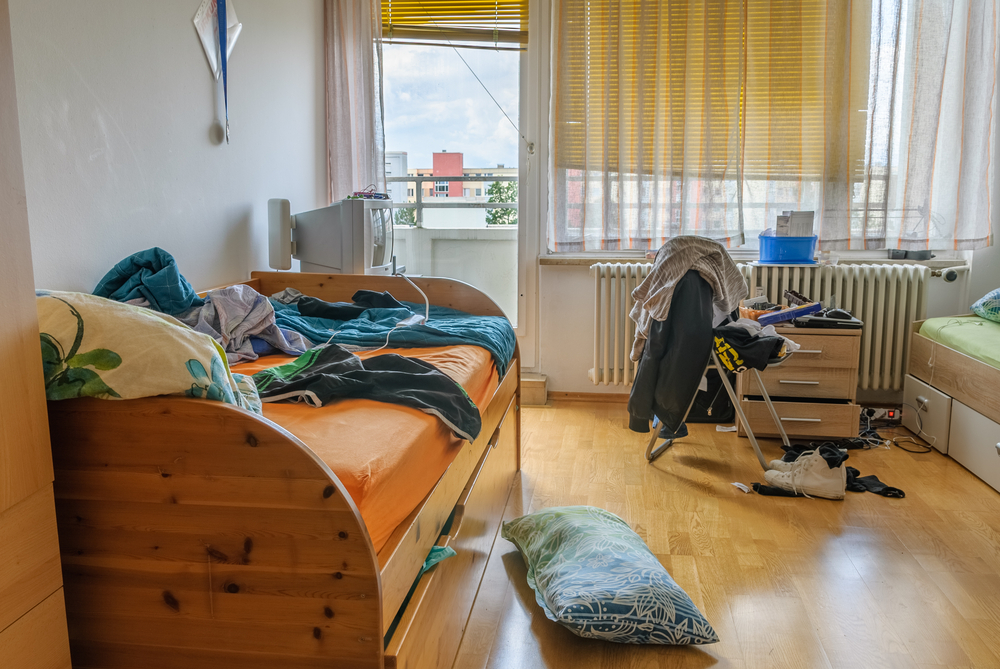
The mistake here is clear. Simply, the lack of preparation means the room is sold short and is not attractive to people viewing it.
Please DO NOT do this! The entire purpose of your estate agent photography is to sell the viewer a vision of what it might be like to live in this home. Your photos are a vital part of your property marketing.
Very few people are going to be able to do that if you present images with messy rooms, unmade beds and clutter spaces. If you’re unable to prepare the property properly in advance, it’s a must to use property photo editing to do things like remove unsightly items.
How Could This Photo Have Been Better?
- The room should have been cleared of all clutter.
- The bed should have been made.
- The curtains and blinds should have been opened.
We recommend that you always walk-through a property before you shoot in to make sure everything is in order for taking the best possible photos.
It’s a good idea to use a Property Preparation Checklist and also share it with the vendor if possible so they can assist with the preparation before you start the photo shoot.
Uninspiring Spaces
The problem with a photo like this is that it fails as a visual aid. A blank space like this really doesn’t help the viewer to visualise what it would be like to live in a property.
It also makes it more difficult for the viewer to get a real perspective of the space.
A properly staged property works more effectively because the viewer can imagine better how the space could be used and what kind of lifestyle the property would offer.
Granted, some people have great imaginations and can fill in those gaps for themselves, but most cant!
How Could This Photo Have Been Better?
- Virtual staging could have been used to make it easier for the viewer to imagine actually using the space and living in the property.
- If virtual staging wasn’t an option, the sofa should have been removed (in real life or with Item Removal editing) and the property presented in an unfurnished state.
Virtual staging example from PropertyBox
Poor Equipment
In this Instagram age, it’s easy to think the phone is a suitable camera in all circumstances. In the case of estate agent photography however, it is not!
The picture on the left was taken on an iPhone and the picture on the right taken professionally.
As shown, it is not possible to take high quality photography that attracts potential buyers using a phone or even a compact camera.
The easiest way to avoid poor equipment ruining your photos is to hire a professional photographer but where this is not an option, you should use a basic Estate Agent Photography Kit.
A basic kit will include:
- A DSLR Camera
- A Wide Angle Lens
- A Tripod
- A Memory Card
Check out our tops picks for your estate agent photography kit here.
How Could This Photo Have Been Better?
- The photo should not have been taken on a mobile. A DSLR should have been used as was done on the right side.
- The photo should have been taken landscape.
- A wide angle lens needed to be used to capture a wider sense of the space.
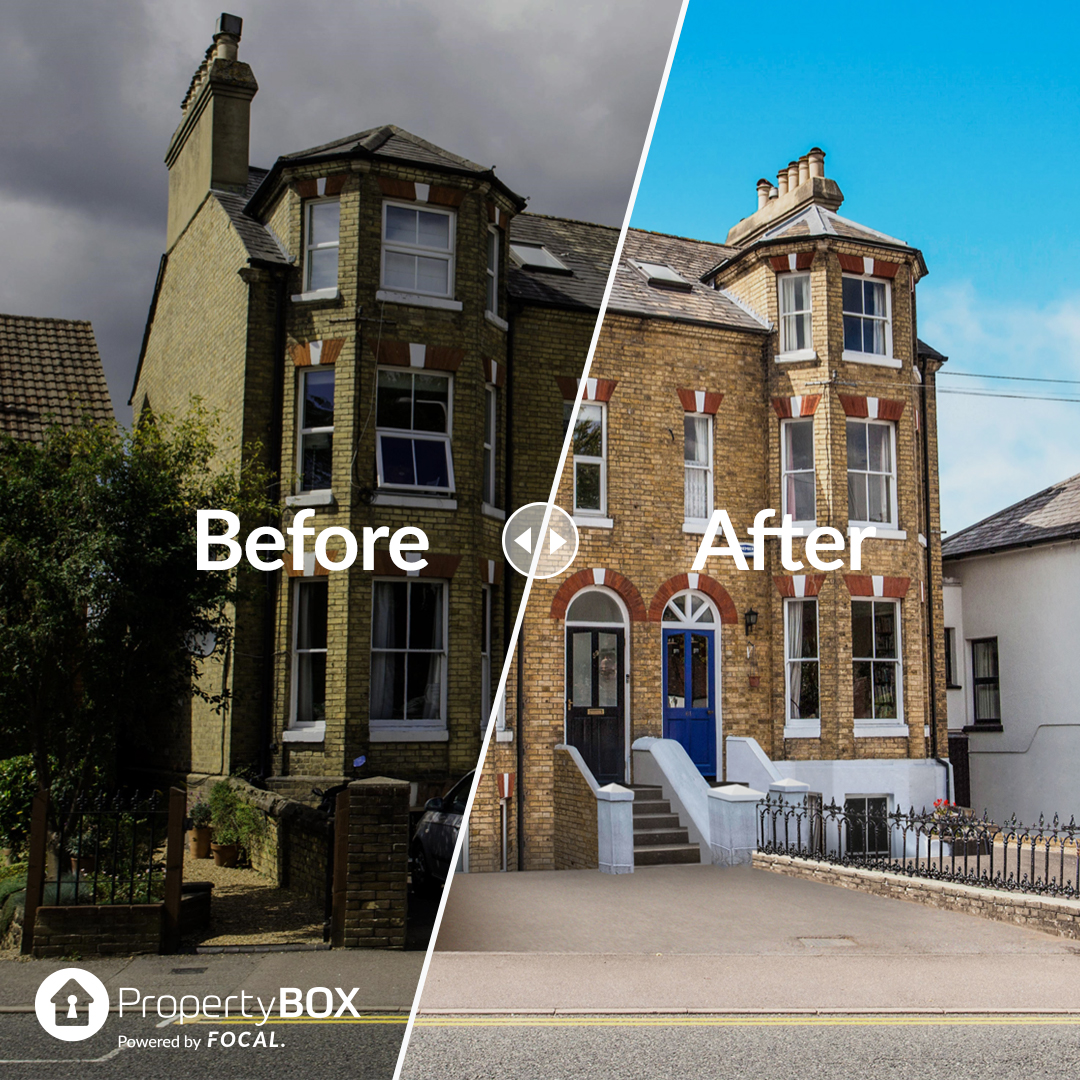
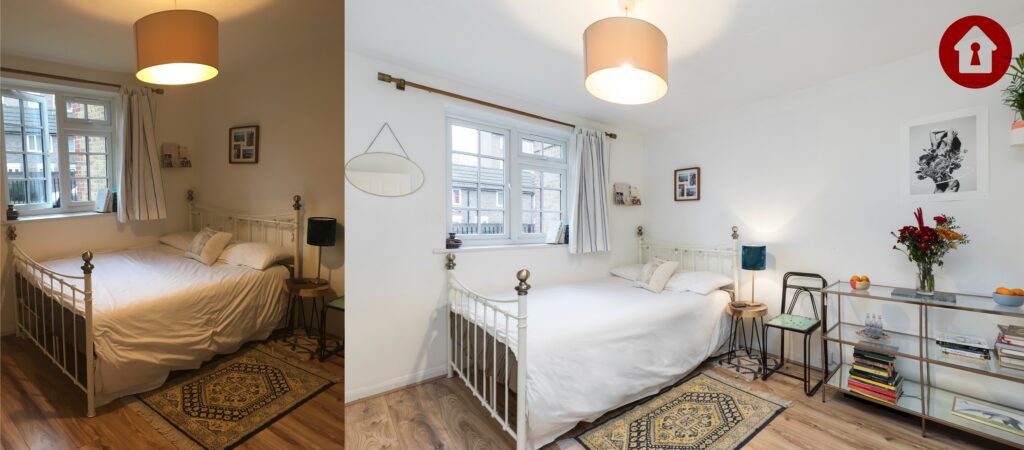
Unedited Photos
The original photo is shown on the left. It’s mistake? It wasn’t professionally edited. This means that although the photo is well frame, it falls short because it’s gloomy and uninviting.
A brighter, clearer and more balanced photo like the edited version on the right will attract more buyers. The difficulty is that these factors can be heavily affected by anything – from the indoor lighting to the amount of clouds outside.
All of your property photography should undergo at least a basic edit. This can be done with software like Adobe Photoshop if you know how to use it or using a complete professional editing service like PropertyBox.
How The Photo On The Left Could Have Been Better?
- A basic edit should have been applied to both photos (as demonstrated on the edited version on the right).
- The sky should have undergone correction to be brighter as this encourages more clicks and interest (as demonstrated on the edited version on the right).
- The wheelie bins could have been removed with professional property editing.