Email direct to your QSM (Quality Success Manager)
Service Delivery Team
Ensure jobs are booked in and assets (floorplan / photos etc) are uploaded on time. Discuss travel fees. This team manage the majority of day to day photographer queries inc. post-production and order allocations. (Live chat for quickest response)
Phone, webchat, text, email.
Customer Experience
Looking after client queries
Phone, webchat, text, email.
Account Management
Secures the longevity of the PropertyBox / Estate agency relationship.
Via your QSM
IT
Support IT issues including problems logging in to Focal Pro App and when wrong assets are uploaded
Once a job has been allocated to you, you need to ACCEPT or DECLINE the job in order to move it to the next stage of booking.
*It’s important to ACCEPT or DECLINE as quickly as possible so that if you are unable to book yourself it can be reallocated to another photographer asap.
The Focal Pro Mobile App has a live map showing jobs currently awaiting allocation to a Pro. You can allocate an order to yourself using the map as long as you have the skills to complete the order.
It’s really common to receive an order with a note added from the agent saying ‘please call on Monday to book in’, or ‘tenants moving out on 3rd – We should have keys after then’.
It’s also extremely common that your first attempt to get in touch with the key holder results in a short wait for a reply, either because you’ve left them a voicemail, sent a text or they’ve said they will come back to you.
It’s important that these jobs are logged in the system using one of the options from the ‘couldn’t book’ drop down menu. This will pop it straight into the pot of jobs that we are not expecting to have active updates on just yet, and also tells all parties that we are on it.
All of these situations count as attempts at making that important First Contact.
If a job is allocated to you and not accepted within 24 hours, the system will automatically deallocate and send to a different photographer.
Why? It’s important we start the process of booking in an appointment with the keyholder as soon as possible and gives agents confidence in our service.
It is common that when you try and book an appointment the key holder is not ready to proceed yet. To keep your portal organised and keep all parties updated please put these jobs ON HOLD in the FocalPro App.
This is simple to do in the app. Simply open up the job and select either Reschedule (if you have agreed and alternative date) or Cancel Appointment (if you have not yet agreed and alternative date)
At times one or more product on an order will be cancelled but the rest of the job will still go ahead. This may be that the owner has decided against having a Matterport or floorplan of their property.
Following this process correctly will ensure that this product is cancelled from the order, updating all parties that an upload is not expected (so you will not be chased for an update by the Focal teams.)
Understanding the difference between cancelling an appointment and cancelling an order is very important.
Cancelling an appointment means that the job will stay live in our system. Cancelling an order removes the job from our system completely so this should only be done if the agent no longer requires the marketing information.
When cancelling an order, please select the most relevant option from the 3 and add any additional notes that may be relevant. Note that anything you add here may be visible to the customers and the Focal Team so please do ensure they are customer friendly.
*NEW Using ‘Appointment Slots’
What are Appointment Slots? The Focal Pro App allows you to open up available slots which enables agents to book appointment slots in direct with you, reducing admin and ensuring an ever quicker service. The default setting for this is for NO slots to be available so if do not select any then the agents will not be able to book appointments in direct, but will still be able to select you from the dropdown menu when placing orders.
Under Appointment Slots you will see 3 tabs:
Appointment Slots Default Week Unavailable Days
Appointment slots calendar
The first tab is called Appointment Slots. Here you can see and manage your weekly calendar entries.
It contains a full week Monday to Sunday, with 6 slots per day. Each slot is set for 2 hours and starts from 8am.
On the calendar you can scroll through week by week for up to 3 months, and manually select which slots you wish to open up.
The Apply Default Week button will clear all entries and replace them with the same week as outlined within the Default Week tab.
Default Week
You can use the Default Week tab if they wish to set up a recurring weekly schedule.
Once the default week is set it will automatically update the calendar within Appointment Slots, to any week without entries already submitted.
If you previously added available slots to a weeks view, we will not replace the week with the Default Week, so you will not lose any ad-hoc entries.
Each new week that rolls over will also pick up the Default Week view.
Unavailable Days
This an existing feature that was once found within Settings.
We have moved it into Appointment Slots to keep configurations of available or unavailable in the same place.
The ‘Unavailable Days’ tab will override any availability set in the appointment slots calendar. If you’ve marked certain days as unavailable, they will not appear as open for booking to agents, even if time slots are marked as available.
Keyholders are given the opportunity to rate their experience following an appointment using a scale of 1-5*’s. This will show on your Focal Pro App log in.
What if a rating does not feel relevant or fair? On occasion you may receive a rating that is not relevant to you contribution to the overall service OR a low rating which does not match the positive written response. We regularly check any ratings below 3* for such scenarios so it’s likely we pick it up, investigate and remove if inappropriate but if you see a rating which you would like us to investigate further please get in touch with your PSM to discuss. We are unable to remove any ratings older than 28 days.
All standard fees are automatically added on to your invoice when ready for billing with no need for additional admin.
Only products which have been added to an order can be charged back to a client so if you see notes asking for a drone shot but no product line for drone please get in touch so we can get the order formally amended and cost signed off by the client.
NOTE* Half Day and Full Day shoots are generally associated with very large commercial properties which warrant a substantial amount of photographs and the potential for a more creative /lifestyle approach , or event photography for one-off events. Sign off must be agreed by the client prior to booking the appointment.
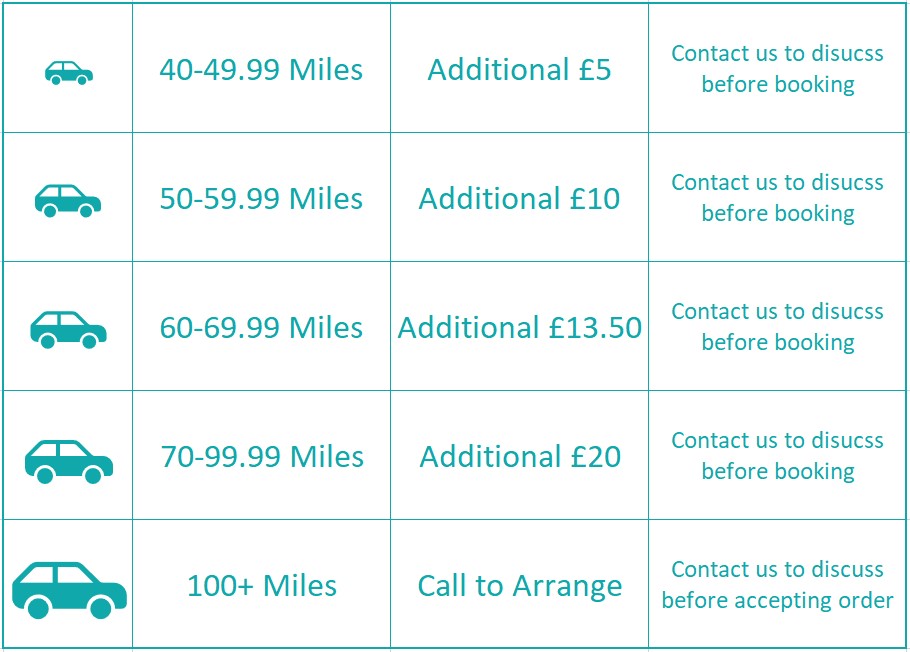
Additional fees include anything that is non-standard. These need to be requested either post appointment (larger property or cancellation fees) or in advance of booking appointment (travel fees).
*Larger properties and cancellation fees must be claimed asap using the Claim Large Property Fee/Same Day Appt Cancellation Fee tab in the app within 7 days of original appointment. Eligibility will be checked prior to authorisation and claims made prior to the appointment time will be declined. If you are unable to claim a cancellation fee via the app as it has become greyed out please email onboarding@focalagent.com and include all relevant information useful to your claim.
Additional travel fees need to be agreed with Focal before booking the appointment*
Note we cannot pay additional travel fees if they have not been agreed in advance.
*Additional travel is not paid for branches where you have a preferred relationship set unless in exceptional circumstances (i.e. way out of normal coverage area) or on jobs which are within a postcode prefix listed on your profile.
Accuracy of measurements and the level of detail are arguably the most critical parts of developing a floorplan.
The core aim of your measurements is to provide potential home buyers with accurate and realistic floorplans so that they get a visual understanding of:
•A property’s overall size
•The scale of the rooms, for example the relative size of a master bedroom compared to that of a second bedroom
The sketch produced at a property should contain all the necessary details so either you or someone else can use it as a guide to produce an accurate, digitized floor plan later.
If you’re working on behalf of an estate agent you can ask them if they have a brochure or plan available, especially when attempting your first few sketches. This will serve as a useful guide, as estate agents often take property dimensions and room names (do they want it to be called a lounge, living room or sitting room?).
It is, however, a requirement for you to take your own measurements due to changes or possible inaccuracies on the agents’ version ofthe floorplan.
Your essential kit for drawing floorplans consists of:
•Laser measurer, available for purchase on Amazon for £10-100 (calibrate this regularly). Leica Disto is our recommended product due to durability and reliability. (NOTE – laser measurers must be calibrated monthly.)
•Engineering graph paper (provided by us at the end of this section)
•Symbols guide (provided by us at the end of this section)
•Sharp pencil, rubber and pencil sharpener OR pen (erasable pens advised) – Digital alternatives can be used.
Here is a list of what to measure to create a complete floorplan:
•Interior wall to wall measurements of each room
•Internal garage measurements to reflect the maximum space between the main wall faces
•Rear garden measurements (length followed by width) to be indicated on the floorplan using dotted lines (a garden is only required if specifically requested by the agent).
•Fixtures and fittings, any permanent items attached to the floor, as well as cupboards, wardrobes and smaller fixtures that are attached to the external walls of the property or are exceptionally large
When taking measurements record them all in metres, rounded up or down to the nearest centimetre.
Note: front gardens and communal gardens are not required, whereas windows, doors and utility features need not be measured only sketched to scale.
Use engineering graph paper, where large squares are divided into 5 minor squares. Assume a scale of 1 metre to 1 large square or 20cm per small square.
FAMILIARISE YOURSELF WITH THE OVERALL LAYOUT OF THE PROPERTY
If possible, choose a room or corner to start at that will enable you to move from one room to another until you arrive back at your starting point.
Alternatively, choose the longest wall that is shared by several rooms. A good reference point would be an internal wall that runs true from the ground to the upper floors of the property. Use this to ensure your upper level(s) are in proportion with the rest of the property.
In a semi-detached property that might be the external wall nearest to the front door
START EACH NEW FLOOR IN A COMMON POSTION
Ensure it’s the same position on the paper as the corresponding position on the previous floor. This way you can check both floor levels are accurate and that the stair walls are properly aligned.
as the corresponding position on the previous floor. This way you can check both floor levels are accurate and that the stair walls are properly aligned.
LABEL EACH FLOOR
Do this by calling them ground floor, 1st floor, 2nd floor, etc.
SHOW FLOOR PLAN LEVEL FOR FLATS
For example, Flat 4, level/floor 5.
CLEARLY IDENTIFY THE FRONT DOOR
Just write ‘front door’.
LABEL ALL ROOMS & SPACES
Use clear labelling and state the current usage of each room or space.
SHOW DOORS & WINDOWS IN THEIR CORRECT POSITIONS & SCALE
Ensure you check the swing direction and hinge side of each door you draw, and be aware of different door types e.g. double, sliding etc. (refer to the floor plan symbols sheet at the end of this guide).
REMEMBER FIXTURES & FITTINGS
Floor plans include any fixtures and fittings that are permanently attached to the floor.
These include:
•Kitchen counters, breakfast bars, kitchen hobs, sinks and kitchen islands.
•Bathroom cupboards, sinks, toilets, showers and baths.
•Fireplaces, chimney breasts, fitted wardrobes, airing cupboards and structural columns.
•Show gas hobs or solid hobs and the correct type of sink, basin and showers.
GET THE STAIRCASES RIGHT
Ensure you clearly show the position, direction, turns and landings of a staircase. Show staircases and steps with arrows labelled up.
or down.
GARDENS
Show the width and depth of the garden, as well as indicating how the garden is attached to the property with access details, for example a gate attached to the property (only required if specifically requested by agent).
GARAGES & OUT BUIDLINGS
If there’s access, please ensure that any garages have been included on the sketch (if you can’t gain access, please leave a note on the order to let us know). For any annexes or outbuildings please add a floor plan where possible (and add a note to order if not possible), there’s no need to include any non-structural outbuildings on the sketch (i.e. sheds or greenhouses).
ADD NOTES
Make notes on the drawing if there is something unusual or non standard about a room, such as a kitchen without a hob, to avoid any problems when it comes to interpreting the plan once you have left the property
DOUBLE CHECK
Walk through each room on a floor and check you have recorded all details correctly before moving to the next floor.
COMPASS & RADIUS
Measure from the front door of the property, including the 360 degree radius with ‘North’ clearly labelled.
•Take measurements at a point above skirting board level but no higher than 1.5 metres above the floor level
•Take at least two measurements for each room of the property (width and length), including utility rooms and garages
•Write all measurements on the plan against the corresponding wall. Non standard rooms, such as rooms with bay windows, will require more than two measurements (for example width, minimum length and maximum length)
•Measure and label ‘L’ shaped rooms using arrows, to give clarity to the people drawing from the sketch
•Where there is a stepped change in floor level, measure and express each section separately. For split level floors, add notes to the plan to explain and ensure the steps are clearly identifiable.
•Measure and sketch annexes separately as if they are a separate floor, unless they are integral to the main building
Any room which is not rectangular will require additional measurements on the sketch to ensure accuracy. The final plan will display the 2 main dimensions of the room which make up the majority length/width.
In this example, the 2 main measurements are the Maximum dimensions of the room.
In the above example the recess forms less than 50% of the longer wall so the shorter length of 2.49m will be displayed on the final plan.
As the combined recesses take up the majority of the longer wall, the measurement into the recess will be displayed on the final plan.
As the combined recesses take up less than 50% of the longer wall, the measurement to the recess will be displayed on the final plan.
Rooms with bay windows require a measurement ‘to bay’ and ‘into bay’. The ‘into bay’ measurement will be displayed on the final plan.
Where possible measurements should be taken to the back of fitted wardrobes.
L-shaped multi purpose rooms may be best split into two areas and measured as such.
Chimney breasts with no working fireplace: should be shown by a hatched rectangle.
Large fireplaces within older and rural properties: may require you to include void wall areas to the sides of the fireplace. Add measurements as you think necessary, making notes on the floorplan to describe any non standard objects.
Eaves storage: should be labelled and measured where possible.
Low ceiling heights: if less than 1.5 metres should be drawn using a dotted line and labelled with a note.
Balconies and terraces: should be measured, sketched and labelled.
Thick walls of older cottages: if more than 0.5m thick these should be drawn on.
Basements and attics: should be measured if they are safe to access, have a fixed staircase and are a feature or selling point of the property (converted or partially converted.) If in doubt and it is safe to do so best practice is to measure and add to the sketch as it can easily be removed if not required.
Outbuildings: Where there is access permanent structures should be included such as garages, annexes, brick built home offices or substantial summer houses. Sheds do not need to me included.
To ensure you don’t make mistakes that mean your floor plan sketches are incomplete or inaccurate make sure you have considered these points:
•Check that all rooms on your floor plan have windows correctly shown.
•Make sure you include all doors, with the correct swing direction.
•Wobbly lines can sometimes be misinterpreted as curved lines. Take care especially when drawing long walls; use a sturdy ruler and don’t forget your eraser.
•Clearly label open plan rooms. For example, a room that is both a kitchen and a reception room should be called ‘kitchen/reception room’.
•Write the address on each sketch to avoid any confusion later when completing floor plans for multiple properties.
The single biggest cause of Floor Plan errors is not checking it before submitting to us. Please make sure you give yourself enough time and always check that you have included all details on floor plans before leaving the property.
Questions to ask yourself:
Is the plan fully legible?
Is the front door included?
Do all the doors have the correct hinge side, swing direction, door type? Are there windows in every room?
Is every room correctly labelled?
Are all permanent fixtures and fittings included? Are there at least 2 measurements per room?
Are rear garden measurements included with approximate max length and width (if required)? Are there notes explaining anything complicated or unclear?
Is the image quality of the scan or photograph good enough?
Lifestyle Property Photography (selected clients and photographers only)
Head Shots (Bespoke order)
Billboard Photography
Note – Only products ordered by clients can be charged for so if notes on a order mention drone but there is no product line on the order form then please get in touch so we can discuss the order with the client.
Most Focal photo shoots require 20 images, of which a selection anywhere between 8 & 12 will initially be chosen for editing either by the client or by the Photographer. This process is called Sample Selection.
On occasion you may see an order for 35 photos or a more bespoke order offering more (half day or full shoots)
Centrally framed, clearly indicating which property is being marketed, and drawing attention to any outside features such as off-street parking make for an eye catching front external. Equal part sky and floor and levelled on the Y axis down the centre of the frame. Where possible stand back and use the lens to zoom in to minimise key stoning, remembering that verticals will be pulled out in post production.
Maximise the space and ensure camera is level. Shoot at approx. chest height – too high and you will lose ground from your frame and the focus will no longer feel like it is on the garden.
We recommend shooting on a tripod as this gives full flexibility for your choice of shutter speed and ensures that once the composition is set you can move on to the next element of the shot – lighting.
Camera Height – Height should be set at approx. 90-100cm for most properties/standard rooms.
General height may need tweaking for very low or very high (vaulted/double height) ceilings with smaller adjustments made for bathrooms (10-15cm lower) and kitchens (20-25cm higher) in order to see the depth of the worktop.
There should be a similar ration of floor to ceiling in most standard rooms.
General height may need tweaking for very low or very high (vaulted/double height) ceilings with smaller adjustments made for bathrooms (10-15cm lower) and kitchens (20-25cm higher) in order to see the depth of the worktop.
Composition
Maximise space by getting as far back into the corner of a room as possible and if shooting from a doorway position yourself in the door opening itself to ensure maximum space is captured in frame.
Camera should be level on both X & Y axis which will result in parallel verticals. Where possible introduce an element of 3rd wall (2 point perspective) which will support maximising the proportions of the room.
It’s important to get the right balance of exposure on external and garden photos. Too bright and the highlights in the sky may bleed into the roof top / horizon Too dark and the shadows will lose detail. (Image examples are shown pre-edit, pre vertical correction)
Windows should be exposed to maximise natural and ambient light without losing detail in/around the window frames (where in the composition) and to maximise natural light when angled away from the light source without losing too much detail in the highlights. Settings should be adjusted for each setting to get ideal results.
The ideal end result for any internal photo is of a room that looks like it has been lit with natural / ambient light so any additional flash should be subtle and natural in appearance, filling in shadows where needed.
Power output, direction of flash and level if diffusion all have an impact on the end result.
Re recommended shooting on Manual (rather than TTL) and adding a diffuser if you have one.
Exact direction and power will vary depending on the situation but look out for unwanted (unnatural) shadows and minimise as much as possible. Angling the flash back slightly to bounce it is the best starting point for most spaces.
Blue skies are added in post production to all external shots. In order to ensure a convincing result it’s a good idea to add a gentle warm tone to your shot in camera.
Interiors shots.
It’s important that your images represent the colour tones of a space accurately. It is tricky to rectify this in post production as confirmation of your white reference point is best made on site.
Most modern cameras have decent white balance control so in the majority of cases Auto White Balance will work wonders. On occasion you may need to tweak the tone to get a closer match with the space.
In order to be as efficient as possible we encourage smart shooting habits. In larger properties there is no need to shoot every angle of every room. Prioritise main spaces (Kitchen, Reception, Master Bedroom, front external etc) for additional angles. This will allow you to shoot 20 photos well rather than rush through 40+ and ensure that if you are required to do the Sample Selection then this process is quick and easy.
Sample Selection
Our pro photography service has 2 options for sample photo selection. Either the agent selects which photos they want enhancing (default offering) or the photographer does it at point of upload. Certain branches or companies will opt for the photographer to select the photos to speed up the whole process of getting a property live (on average by up to 2 days). For this second option, you will need to select the number of photos as is specified on the system. Those photos will then be edited and sent off to the client directly as final photos.
Why do we offer this option?
Speed of delivery is an increasingly important part of our overall service. Using Photographer Sample Selection speeds up the overall turnaround time from point of images captured to marketing details going live online by an average of 2 days. Being able to offer a faster service gives agents a better chance of winning more business and results in more orders for you over time. Many if not all of Focal’s competitors also offer this option as standard so we do often get asked for it.
There are of course pros and cons to each sample selection option. On one side it’s quicker to get a property live. On the other, it means the agent has less control over the final photos. This is why we leave the decision about how to work down to each customer.
As an added positive if you have selected the photos, the first time the client sees your photos they will be fully edited and ready to go.
How to make the perfect selection
It’s important that the images chosen will give a potential buyer a comprehensive overview of the property inside and out. You will likely capture at least one angle of each room, now it’s just about selecting the best options.
In larger properties this is fairly easy, and you may have to prioritise larger rooms over smaller ones. It’s unlikely a photo of the downstairs loo will take priority over the dining room.
In smaller properties, you may need to include additional angles, so alternative shots of the main rooms or external will be favoured. Most rooms have one ‘obvious’ angle. If you are stuck for choice, select a shot that captures the main features: windows, fireplaces or an angle looking through to another room.
The key shots to include
Front external, reception room(s), kitchen, main bedroom(s), bathroom, garden, streetscape (if applicable)
Want to get a head start? Check out the agent’s properties on Rightmove and Zoopla – what do they usually pick? How do they like to show off their properties?
Is this on every order?
No. Only organisations or branches who have opted in will have this service. The default offering is Agent selects the photos they want.
How will I know I need to select images?
After uploading your images, you will be prompted to select the correct number of photos for Sample Selection. Once they have been selected, you will be able to confirm your upload.
What if the branch doesn’t like my selection? Don’t worry. If you follow the guidance above, this will rarely happen but if it does, the team at Focal HQ will handle it internally, offering one or more additional shots from the original photos you uploaded where applicable. If it becomes a common occurrence, then we’ll either let you know what the branch is looking for or ask you to have a very brief chat with them about preferences.
How can I make this process as simple as possible?
Everyone finds a method that works best for them. Try not to over shoot too much – it’s rare that you need to take 4 angles of bedroom 3, or 3 different shots of the en-suite for example, and delete test shots in camera as you go so that the transfer and selection process when uploading is as quick and fuss free as possible.
It helps to recite photo’s in order you might normally take them when ticking them off: ‘reception, kitchen, dining room, bedroom, bathroom, garden, front.’
Choosing Which Images to Upload
It’s important to remove any images which you don’t want the client to see before you upload rather than do one big upload ‘dump’. Any client who orders via the PropertyBox platform receives ALL images after being edited by default so we don’t want multiple exposures uploaded or accidental images uploaded (blurry exposures, accidental clicks etc) You will know that an order has come via the PropertyBox platform as the order number will start with ‘ORD-‘ Ensuring you only upload the images intended for edit and for the clients eyes makes their marketing image selection far easier and also ensures that you won’t be judged negatively by a shot which was never intended for marketing.
While there is no requirement to edit shots, some people choose to shoot using methods that benefit from some work prior to uploading (HDR, Flambient or when converting Raw to Jpeg etc).
So long as a good initial JPeg is uploaded which is within the min/max file size and resolution than AI will be able to process a good result. A good shot should have nice straight verticals and be well lit. If either of these criteria are not met then it can be wise to tweak prior to upload.
Follow the motto Less is More as too much can be counterproductive to the final image and adhere to the guidelines below.
Red – Avoid Sharpening as AI applies it anyway and sharpening twice yield negative results. Blue skies will always be replaced so there is no need to spend time doing this. Amber – Be really careful airbrushing photos so as not to change anything permanent within the shot to mislead. It’s not just the object in question but what it could be covering up so is best left. If you do have requests from agents, please ask them to contact us directly.
It is fine to lift shadows or tweak highlights but don’t feel like you have to do it and don’t take it too far.
White balance – we’ve all had that one tricky space to shoot where WB control was just a nightmare. In these shots it’s OK to tweak but best practice is to get it as accurate as possible on site when you are in front of your white reference point.
Green – Lens correction is a worthwhile tweak. We are not insisting that you do it but as every lens has a different profile it is something that AI can find tricky to perfect.
Compositional crop – for those of you who shoot mainly with wide angles and might want a tighter crop on views / externals. Crop these shots as you would like the compositions to be portrayed.
Lifestyle shots aim to capture the features, tone or ambience of a property or space.
You’ll benefit from a non-wide angle to maximise potential for these shots, something like a 35mm or 50mm is ideal. If you’re looking to invest then look for a nice fast lens (like an F2.8 for example.) You also need to hunt out lifestyle shots, you won’t just snap them and you’ll often fine tune them before settling on your final composition. Look for period or unusual features, how the light falls into a space or a spot that looks perfect for that afternoon cuppa. Really dissect your framing, reminding yourself of the rule of thirds.
In this section we explore the main themes to explore to help inspire.
In order to capture lifestyle shots, you first need to hunt them out. Here are come tops themes to get you started.
Change of perspective.
We tend to shoot our standard shots from a similar height, but with lifestyle shots you can be a little more creative. Look up, look down or look through. Get low down & shoot through the flowers for example. The options are endless…
Depth of field.
Unlike the standard photos you can open up your aperture and really play with a shallow depth of field. (Just remember to switch it back when you go back to your standard shots)
Take care when choosing your focus point though. Make sure you are selecting your focus point, don’t allow the camera to choose for you. Spot focussing is your friend.
With close up shots which explore depth of field, off centre framing generally works better than centralised (as in the tap example.)
Features
Feature fireplace, fancy bath, bay window, exposed brick, or a window with a view – these can all offer great opportunities for lifestyle shots. Consider combining with another lifestyle theme like symmetry or lighting control.
Lighting control
You can get a bit more creative with your lighting control on lifestyle and choose to shoot lighter or darker than the norm, creating an ambience or highlighting the way light falls on a certain area.
Symmetry
This should be an easy one to spot, but take your time perfecting it. Symmetry only works when it really is perfectly symmetrical.
Reflections
While mirrors can be a nuisance on the occasions you’re try to hide from them, they can offer a fantastic opportunity for an alternative perspective too. Combine with a shallow depth of field on closer compositions with the focus point on the reflection as the subject.
Frame within a frame
Everyone loves a view, but don’t just consider view from the inside out.
If you have never done this sort of photography before the best way to train your eye to find these shots is to practice practice practice. A great way of improving your eye is to set yourself a challenge. For example, take 1 lifestyle shot in every property you go to, or try and capture 10 in your own home. You’ll start to see things before you know it!
Elevated photography pole min height 6m OR Focal approved quality Drone
Regular camera OR quality checked alternative camera body
What do I need to shoot?
Minimum 2 photos uploaded, differing angles and/height to showcase the property.
2 photos uploaded in the ‘elevated photography’ section in App uploads
*Any additional can be uploaded within the standard photos
Minimum Height 6m, max height 12m
What is the fee? £10 in addition to other products
FAQ
Can I use a drone instead? Yes, but make sure it meets the minimum standard for quality detailed on our Focal Drone Photography document and do not go higher than 10m.
Can I use a different camera on the pole to take these shots? Yes, so long as the quality of the image meets our minimum standards. Older/lower quality action cams are not acceptable. New high quality action cams or lighter mirrorless systems may be). If unsure, please speak to your PSM who can assess a test shot for you.
Minimum 2, Maximum 10 photos uploaded, differing angles and/height to showcase the property. *Additional can be uploaded within the standard photos.
Minimum Height 10m
Image size no larger than 10MB
Image ratio 3:2
No editing required
What is the fee? £30
What Should I Aim to Capture?
With drone photography, you’ve got a great opportunity to showcase a property from a completely unique perspective – not just the building itself, but also its surroundings and location.
The key is to capture a strong variety of shots by using different heights and angles. You can upload up to 10 drone images per order, so it’s worth making the most of this to create a well-rounded set.
As a minimum, we recommend capturing:
Front angle
Rear angle
Two side angles
A straight-down (top-down) shot to showcase the land/garden
From there, you can use the remaining shots to add variety by adjusting height and exploring more creative angles – this really helps bring the setting to life.
What is Drone+? A new product offering which includes includes 2+ drone images and a short drone video (photographer just takes a few mins of raw footage, Focal edits and creates the final video)
Recommended models: DJI Mini 2, DJI Mini 3 or newer
Required assets for Drone+ Product:
2-10 photos taken at different angles to showcase the property.
5 separate clips of differing styles, 20-60 seconds approx. each ( with a total 3-4 minutes of video footage required – shot content details below)
Check video settings to conform as closely to the below as possible:
Format: MP4
Aspect ratio: 16:9
Resolution: 1080p (HD)– NOT 4K
Framerate: 30fps
Check weather reports to ensure weather conditions are clear (no rain, snow, fog expected). It’s okay to pull out/reschedule a drone job due to weather. It’s also essential to shoot with sufficient daylight, so plan ahead to avoid poor light conditions.
See this document to familiarise yourself with best practice for standard drone photography, the legal and practical guides of which apply to Drone+ as well.
Shot Types – Drone+ footage is edited for you, but to make this process as efficient as possible, we’re asking Pros to observe the following shot conventions in order to begin standardising our footage. For DJI users please refer to this guide about Quickshots, which make it easy to automate some of the below shot types.
Below is a breakdown of shot types in order of priority:
Circle – Drone orbits around the subject at a constant distance, maintaining altitude. Please be sure to provideat least 2 full rotation cycles of circle footage, ideally at 2 different altitudes and use the same direction on both, eg clockwise.. The smooth, consistent movement of these shots makes them ideal to use as the core of the drone video. Speed should be medium-fast and constant.
*Speak to your PSM for more info on how to upload this product.
Rocket, Helix, Boomerang – Once you have completed your circle shots, please move on to these. Approach shots showing the scenery as we get closer to the property are a lovely way to start the video. The other shots will work well to add excitement and variety, and assist the editors to create a change of pace in the middle section of the video. While you may not end up providing a version of every one of these shot types please ensure we always have at least some of them included for variety.
Creative shots – these might require some manual piloting! Include them if you spot a good reason for adding them, eg a forest or hills near the property offers an opportunity to create a dramatic reveal of the property as the drone is flown over the obstacle to reveal the property beyond, or we pedestal down to a front elevation shot, and will tend to work especially as the opening or the closing shot if well executed. While these shots can make the difference between a standard video and a truly cinematic final product, we accept that due to weather conditions, the local geography, or if new to drone your level of expertise as a photographer/drone pilot, these shots may not always be possible.
It is your responsibility to ensure you are flying safely as per the manufacturers guidelines and within the realms of your insurance. Should you decide that for any reason (i.e. weather is unsafe for flight) that it is not safe or suitable to fly you have 3 options:
Complete the rest of the order and leave the drone open (drone uploads don’t impact SLAs for this reason). You can then return and upload to the original order whenever you can go back. This is the simpler option from a system perspective and what we would recommend. (Drone part of the visit fee will not be sacrificed)
Cancel the product and then speak to support to get a new order for drone only sent to you. (Drone fee will apply to the new order)
If you are no longer able to complete the drone element of the order (i.e. you are about to go on holiday) speak to the support team and they will reallocate just the drone product.
What are Video Clips? A simple-to-capture video, captured via the Focal Pro app with no editing required by the photographer. It’s all done via our App!
What do I need to be able to capture this?
A mobile phone which can capture 4K video and has a 0.5x zoom and a 3 axis mobile phone gimbal.
How are the clips captured?
When Walkthrough video is ordered, the product will appear in the Focal Pro App. You can then choose to capture either 5 or 9 video clips using your phone. It’s all very simple and takes approx 5 mins to capture. It’s then uploaded via the App and edited in house.
Where can I get a Gimbal?
Various retailers sell the Gimbals but we do have a discount available via Wex. Simply email through to business@wex.co.uk who will verify with our team that you part of the Focal Community and then arrange your discount. Discounts will vary depending on the model you choose.
Summary of Settings & Clip Styles
Video clips must all be shot in:
4K or UHD (depending on your brand of handset)
Ultrawide lens / 0.5x zoom
16:9 aspect ratio
30 FPS (Frames Per Second)
If these settings are not used then it is likely that you will need to revisit to re capture the video content so it is really important you double check this before capturing any video content. Shooting in a lower res, non wide angle lens or using the incorrect aspect ratio will mean we are unable to create the both landscape and portrait versions of the final video. It’s just as important as checking your settings on your standard camera!
If you happen to shoot in 60 FPS in error then we will be able to salvage the clips so please do upload as normal in this instance.
Please ensure that HDR Video is toggled off. Turning this on has a negative impact on colour saturation in the final edit.
How do I decide how many clips to capture?
You are required to capture either 5 or 9 clips depending on the property. It is up to you to determine the most appropriate clip number but you should aim for the 9 clips where possible, especially in properties with 3 or more bedrooms. Avoid repeating clips / rooms but try to capture key spaces and selling points such as hallways, views, ensuites, gardens/balconies.
Clips Styles Explained
Watch our short video for examples of clip styles
Video Clip Styles Avoid getting too close to walls/decor – while it’s fine to ‘reveal’ a view from a window from an interior clip we don’t want clips to end too close to walls/tiles/decor etc.
How to Capture Video Clips
There are 2 methods available for capturing and uploading your video clips – Via the Focal App and via your phones native camera and gallery upload (essential for iPhone users)
Video capture and upload via the Focal App.
Accessing video capture
Ensure on latest version of ‘Focal Pro’ mobile app
Log into app
Go into property
Click on ‘Capture Video Clips’
Choosing the clips to capture
Choose 5 or 9 video clips
Confirm will turn blue when you have chosen 5 or 9)
Change the order if you need to by moving them around
Bad weather impacting your ability to film outside?
The front of Property is always selected. You should always TRY to capture the front of the property but if you can’t do it due it (rain, excessive wind etc), just start with entrance hallway or similar.
Turn phone to landscape
If it’s not letting you past here, go to your phone settings and allow auto-rotate for the screen (so when you turn your phone landscape, the app turns to landscape mode automatically.)
Multiple different videos will be created out of your clips. Please ensure the main element of the video you are filming is always in the middle third of the screen – so that it works well on the portrait videos too.
Now it’s time to start filming – level up your gimbal and position it at chest height. Each scene you capture will come with a series of recommended shot styles to work from. Track in, Twist, & Cinematic. The app have examples of each of these for inspiration.
When you’re ready click ‘start filming’ and you will have a 3 second countdown before the app starts recording. You will then need to review you clip and either Approve Shot or Re-Shoot. When reviewing your clips, keep an eye out for flickering lights in the rooms. If lights are flickering then turn them off and recapture. Failure to do so may result in a reshoot being required.
*Once approved you can not replace this clip.
Can I capture content if I’m offline or out of signal?
Yes!
The Focal app works online or offline BUT you need to have been logged in within the last 14 days before you lost internet connection. The app will only let you login, see basic property info and capture video. It will not allow you add notes, appointments, upload floor plans etc
*Note. The final video edits build in a logical order based on the clip names, so it’s important that the room captured is represented in the name (ie, bedroom clip is of a bedroom clip NOT a kitchen).
Video Capture and Upload Via Native Camera & Gallery
Here’s a short video talking through the process here
Open the Focal Pro App, select ‘Via Gallery’ Option and carefully read the settings notice and following the capture guidelines. Should any of the settings be incorrect then we will not be able to create the final videos and a reshoot will be essential.
You must capture either 5 or 9 clips which are 7 seconds or sightly longer each using the guidelines above. Clips must be no shorter than 7 seconds.
Bad weather impacting your ability to film outside?
The front of Property is always selected. You should always TRY to capture the front of the property but if you can’t do it due it (rain, excessive wind etc), just start with entrance hallway or similar.
When ready to upload add them in to the relevant space types and CONFIRM UPLOADS.
Once upload is complete you can EXIT
*Note. The final video edits build in a logical order based on the clip names, so it’s important that the room captured is represented in the name (ie, bedroom clip is of a bedroom clip NOT a kitchen).
Tips for Best Practice
Make sure your lens is nice and clean
Keep your steps to a minimum with actual movements slow and steady coming from the arm & body
Plan out each capture before you start it. definitely helps to count out the seconds 1,2,3… as you go
Think about where you want to finish your clip
Get the verticals straight before you start to film
Review your clips before confirming
Try and avoid walking past reflective surfaces (mirrors etc.)
Avoiding capturing other agents branding / boards in frame where possible.
Top Tips
To show depth of space, use doorways
Lock your tilt to have 1 less thing to think about to keep verticals parallel
Adjust brightness of the clips using your camera EV (exposure value)
Capture Settings and Set Up Check List
Orientation – Landscape
Res – 4K / UHD
Wide Angle 0.5x / ultra wide angle
30 FPS
16:9 aspect ratio
7 – 8 second clips (Gallery Upload)
Calibrate / level gimbal
Check gimbal isn’t visible (normally in bottom right corner)
Look out for reflections
Review each clip prior to upload to check for flickering lights
Here’s an example of the finished product:
Common Issues & How to Avoid Them
Not uploading the correct number of clips.
Our vid templates are built to have either 5 or 9 clips. So please do not upload duplicate clips to make up numbers as the order will fail our internal QA process and require a reshoot.
Flickering lights
Some home lighting interferes with video capture causing a strobing/flickering effect. It is especially noticeable in kitchen and bathroom shots, where smartphone cameras are clashing with certain LED and fluorescent bulbs. Please ensure you review your shots after capturing them. While recording, you should be able to see flickering live on your display, but even if you miss it at this stage, you will catch it on playback. If you see flickering please turn off the offending lights and retake.
If shots are not bright enough, use EV controls to brighten your image: tap your screen to focus, and swipe up on the brightness slider to ensure the space still looks bright, clean, and professional:
The quick fix is to please turn off the room’s main lights or under-cabinet strips if you see flickering on your screen. We want to flood our shots with natural light instead, so open all blinds/curtains to maximize daylight.
For Android users, tap the screen to bring up the focus circle, and slide the bar at the bottom (usually marked with a – / + symbol or a lightbulb) to the right to boost the EV.
Common Upload Error & How to Resolve It
Many iPhone users in particular have their handsets set to save to the cloud keeping a smaller version of the video only on the device. This will result in this error popping up when you try to upload:
This is easily fixed. To ensure you have the highest quality, go to Settings > [Your Name] > iCloud > Photos and ensure “Download and Keep Originals” is selected, though this will use more storage on your iPhone.
RAW Photography is a new product offering which includes images shot and uploaded in RAW. These images go through high end manual editing to ensure a consistent end result across angles and may include some more lifestyle type shots.
RAW Photography will appear on your profile as a separate product to photography (just like Drone or Matterport, for example). In order to be able to complete an order with RAW Photography you will need a non-wide angle lens for detail shots and will need to be signed off for the product. If you are interested in upskilling, please get in touch with your PSM for more information.
You have 2 options for capture with the RAW photography product, available to clients in either 20 photo or 35 photo packs:
20/35 Photographs taken in RAW format- Unedited, single shot with no additional flash lighting and a balanced exposure (not too bright, not too dark).
OR
20/35 HDR images – Brackets should be captured in RAW, merged into a single unedited HDR and exported as a high res JPeg with no additional editing prior to upload other than lens correction. These may include a few more lifestyle shots taken on a non-wide angle lens where appropriate.
When uploading you will need to organise the 35 shots prior to upload, as thumbnail views will not be available for preview in the Focal Pro app. These images go through top end manual editing before being delivered back to the client in jPeg format.
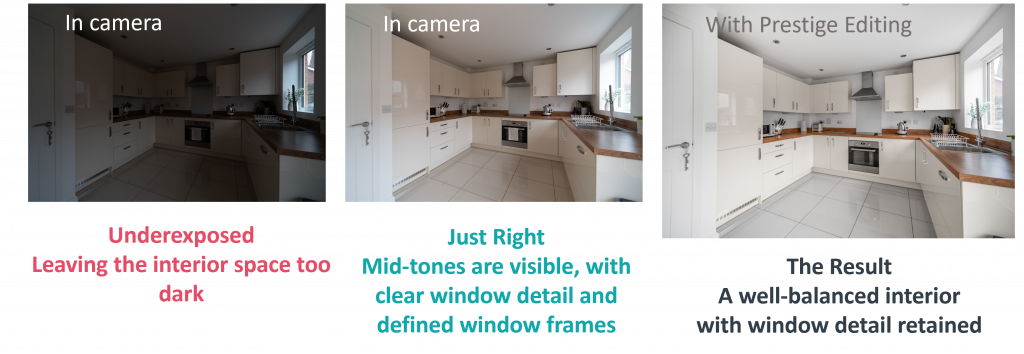
Property photos:Composition is key! Since the lighting aspect of this style of shooting is pretty simple, the focus will on the composition – this needs to be perfect, so switch on those virtual horizons or dust off your hot shoe spirit level as anything unintentionally wonky won’t make the grade. Brightness: Expose to a point where the mid tones are lifted and the colours of the room are clear but DON’T brighten so much that the window frames start to burn out. If you’re lucky you might even get perfect window exposures.
Exposures Explained:
For compositions with windows that have poor or limited views – or for rooms without windows – slow your shutter speed right down and expose for the room & mid-tones, keeping an eye on the highlights. In these situations, it’s more important to prioritise a bright, clean interior and avoid introducing unnecessary noise.
Common situations where you’ll encounter this type of composition include shooting away from a window towards an en-suite, modern bathrooms or shower rooms with no windows, and similar layouts like the example shown. In these cases, it’s better to expose for the room itself rather than trying to retain unnecessary window detail.
Lifestyle shots: Get your creative juices flowing! Change your perspective – Look over, look under, look through, look up, look down… Capture feature fireplaces, a view through an opening, a period feature or a little reading nook. Don’t be scared of really playing around with your depth of field too.
More examples of lifestyle shots and additional guidance can be found here
Where you could fall foul:
Keep an eye on your ISO. We don’t want the final edited shots which look noisy/grainy so we advise you keep the ISO as low as possible to minimise this as use tripod and slower shutter speeds to control brightness. Lifestyle shots: make sure you compose, don’t just snap. Think about leading lines and if you’re going for dramatic depth of field consider where in your frame the subject which is in focus should be (tip, it’s generally not dead centre)
You do not need to be upskilled to carry out Billboard Photography. Orders are reasonably low volume and will be allocated to a local pro automatically.
What is Billboard Photography?
In summary, an image of the billboard to prove to advertisers that the advert is live at a given time. This is not for our standard client base (estate agency) but for advertising organisations.
Take 1+ photo of each advertiser on the billboard clearly showing the advert.
Make sure the images have people / traffic / by passers to show the busy location of the billboard – the busier the better.
Consider using tripod and longer shutter speeds to capture motion blur of passers-by / vehicles.
You do not need to be upskilled to carry out Camper Van Photography. Orders are reasonably low volume and will be allocated to a local pro automatically.
Shoot location should be off-driveway, in a green or open setting.
Around 20 total images, with externals capped at 3–4 and 1 cab shot.
360 view should ideally start inside the van.
Floorplan should always be included for Quirky’s internal use, even if the owner doesn’t request it.
FocalAgent currently offer 2 different types of 360 content: Matterport and Vieweet. They offer a slightly different experience for the end user and are captured using different technologies. FocalAgent clients choose which product is the best fit for their business. Here’s all you need to know about each offering.
Or Matterport Axis + high end smart phone (e.g. iPhone 12 or newer) and tripod/stand.
*Note, Theta Z1 offers faster capture, more reliability and better image quality. Axis is a good cost-effective entry option.
Additional Requirements
Matterport Capture app
Focal Matterport account – Your PSM can set this up for you
How Do I Get Matterport Added to my Profile?
Submit a trial job of any residential property. You will then receive feedback and be asked to resubmit another trial or signed off and the product can be added to your profile.
What’s involved in capturing a 360 Matterport?
Multiple scans per space, planed methodically, starting on the lowest floor in accordance with the training guidelines we send.
Capture external 360’s where possible (be cautious in poor weather)
How long does it take?
It depends on the property size but approx. 30 mins for the average 3 bed house.
Navigation through tour is free flowing, all rooms can be accessed, no obstructions between adjacent scans. No significant missing image data in dolls house view, spacing between scans.
Matterport Kit and How To Use It
(ensure you have read ‘getting started with Matterport’ before proceeding)
Ricoh Theta Z1 and tripod/stand (preferred).
Or Matterport Axis + high end smart phone (e.g. iPhone 12 or newer) and tripod/stand.
Or Matterport Pro range Camera (high end)
*Note, Theta Z1 offers faster capture, more reliability and better image quality. Axis is a good cost-effective entry option.
We have tested other Matterport 360 compatible cameras such as the Insta 360 and Theta SC but the quality is not up to Focal standards.
Initial Set Up
Ensure your lens is clean.
Ensure the camera is fully charged.
Turn on 5 second timer on Theta
Tripod / stand height should be approx. 90-110cm.
Connecting Theta to mobile phone.
For Theta users: Open up wifi settings on you mobile handset.
Find Theta****** (wifi symbol will flash on Theta until connected when symbol turns to solid)
If you need a password, this will be 8 digits on the bottom of the camera starting with the letter Y (just enter the numbers – you should only need to do this in the initial set up.)
Ensure ‘Face Blurring’ tool is turned on (this can only be done once a tour is in the ‘ready for Processing’ status.)
The Step-by-Step process. Matterport Live Job Checklist
Explain the process to everyone present at the property, reminding them that they’ll need to stay out of shot during scanning.
Walk through the property and visualise your scan layout, ensuring a neat grid-like pattern, with no obstructions between scans. Consider any actions that need to be taken to improve the scan path before you begin scanning.
Prepare the scan route – open all internal doors wide and ensure all external doors are shut. Turn on all lights and deliver any final instructions to the vendor if necessary (eg. moving boxes, bins or beanbags up against the walls in order to keep the central space clear and easy to navigate). Blocking doors should be opened to a 45° angle – see this webinar (13:45) and scanning section below for more details.
Set up you camera and connect it to your smartphone/tablet device. Open the Matterport Capture App and press the + button to create a new tour.
The name of your tour must be the property address with the street number removed.
Scanning
Begin scanning starting on the lowest floor and work your way through the route you planned, sticking to a neat grid-like pattern, and scanning every 1-2 metres on average.
Reduce the distance between scans to negotiate tight areas and ensure a clear line- of-sight between any two adjacent scans.
Increase the distance between scans to skip repetitive sections, or areas that don’t deliver high value information to the viewer (eg. a long corridor).
For doors that block the scan path open only to a 45° angle, reduce your scan spacing, and be extra careful to ensure perfect line of sight between all scans. Again, see this webinar (13:45) for full details.
Place entrance and exit points to rooms for easy navigation – do not scan on the threshold. The same applies to stairs, where you should place a scan at the foot of the stairs looking directly up and a scan at the landing looking directly down.
Begin scanning the stairs only once you complete the floor you’re on. Try to scan every 2-3 stairs but be on the alert for alignment issues.
Remember to change floors when you reach the landing (or half landing when dealing with dog-leg configurations). Rather than scanning directly onto the new floor, move the last scan of the previous floor up to the new level and continue from there.
Watch the top down mini map on your device carefully as you scan to ensure scans are being placed correctly. If a scan does not appear where expected, this is called a misalignment and should be deleted immediately (see below).
Mark mirrors and windows as they appear on the mini map as you go.
An alignment error message will be displayed if the software can’t align the current scan. Reduce the distance between the camera and last successful adjacent scan, ensuring there are no obstructions.
Misalignments occur when the software places a scan in the wrong location in relation to previous scans. Locate and delete the incorrect scan immediately and scan again. If the misalignment occurs again reduce the distance between the camera and the last successful adjacent scan, ensuring there are no obstructions.
If the problem persists delete the last “successful” adjacent scan and rescan it, then proceed on to the previously failed scan.
Check the scan preview after each scan to ensure no people or animals appear in shot. If you detect unwanted objects in shot the scan must be deleted and retaken.
Externals
Externals should be taken on every order where physically possible. If you can’t take an external due to poor weather or an unsafe situation please update the agent to set expectations, and ensure you place a note on the job order explaining the situation.
Capture externals after all interior spaces have been scanned. Switch to 360 Capture mode and line up a good shot of the front elevation and a good shot of the rear. If possible, try to line up the camera position with the door entrance as it will make 360 adjustments easier.
Place the 360 image on the map, then tap hold and drag to position it directly in front of the doorway of the 3D model. See this video for more details.
Rotate the 360 if necessary, to align it with the dollhouse model.
A Front of house external should be available for all tours, whether houses or flats. For flats this would be a full view of the block of flats, linked directly from the flat interior (no communal spaces necessary).
A Garden external should be taken in addition to the front of house external for all properties where there’s a garden.
A Balcony external should be taken for properties that have one.
Communal spaces like communal stairs, corridors and gardens are not required for Matterport tours.
Finishing Up
Disconnect your camera from your phone/tablet and turn it off to conserve battery.
Check for any missing scans or large blacked out areas/data holes on the mini map.
Use the trimming tool to exclude unwanted 3D depth data.
Reconnect to the internet via wifi or mobile data.
Tap Upload once satisfied to transfer your tour to the cloud.
After your Appointment
Log in to Matterport.com using the FocalAgent email and password you were provided with to view your tour.
Processing tours will appear as a grey thumbnail with ‘Processing’ written across it. It should be ready to view in 20 minutes – 1 hour depending on the size and complexity of the model. It is hasn’t updated by this point try refreshing the page.
When ready to view it is best practice to have a quick look over the completed tour to ensure all rooms are accessible and there are no misalignments or other undesirable effects.
Misalignments should be flagged up with FocalAgent immediately. Who should be notified?
Start location should be set to the main reception room, in most cases the largest lounge/living room. If the software hasn’t automatically selected one of these locations you should do so using the edit tools.
The Edit tools can also be used to fix placement and rotation of 360 images if they need adjustment. See this video for more details.
Ensure Full Address is stored in the address field below the tour name.
Amend the Address visibility to ensure the street number is not on public display via the details tab by clicking on the middle option (City, State, Postal Code, Country). Ensure there is no house number on the tour name. If the middle option is greyed out remove ‘UK’ from the address. If it remains greyed out please use the last option, (None).
Share the tour for public viewing by clicking the “SHARE” button and selecting “Unlisted”, then click “copy link” and paste the url into the portal.
Update Notes on the order in the portal to flag up problems like missing externals, or a room that had to be closed off and left out of the tour.
Copy the link and paste into the field provided in the portal to complete the job order. You’ve just completed your first live Matterport job, WELL DONE!!!
Poor scanning practice can lead to misaligned scans which interfere with the performance and navigations of a tour. These can not always be fixed in the Matterport software in retrospect so it is important to exercise good practice to minimise these occurrences.
Best practice is to start on the lowest floor of the property and work your way around and then up the property, mapping out each scan as you go with a good line of sight to previous scans and no more than 1-2 metres between scan points.
Keep a close eye on the Matterport Capture app to ensure that the scans are being placed where expected. Delete and re-scan any that are obvious misalignments immediately.
Stairs – scan every 2-3 stairs. A base scan at the bottom of the stairs looking up the stairs is key, and the same from the top looking down. Create a new floor in the Capture App after scanning ¾ of the staircase.
Final checklist.
Before uploading check the following:
Have you marked all windows and mirrors?
Does the Matteport floor layout mirror the shape of your floorplan sketch?
Have you trimmed the model?
Have you included any externals (where safe to do so)?
Have you edited the address to include only the street name?
Common mistakes and how to avoid them.
Scan Misalignments
The most common issue that arises with Matterport tours centre around scan misalignments. Keep an eye on scan positions on the app as and when they are captured and ensure you check the tour before adding the URL link to the Focal Pro App. Most misaligments are obvious and can be avoided using the guidance above.
Blocked Scan Paths
Plot your scan pathway through the property ensuring it is free of obstructions and that adjacent scans have a clear line of sight to one another.
360 View / External Placement Errors
Ensure 360 views are placed in a logical position not too far from the property but not touching the framework of the external walls in the scans.
360 views should be centred on the relevant door they belong to and then rotated so the ‘puck’ to re-enter the house is in a logical position / centred on the external door.
Mattertags – How to Link Multiple Properties Together
A Mattertag is a virtual tag used to communicate additional information and add context to specific locations, objects or features directly inside a tour. At Focal we mainly use mattertags to link two or more separate properties together into a continuous virtual experience.
This enables us to cover two separate buildings within a single tour url, eg a main house and an annex up the other end of the garden. We do this by creating two separate tours, and then linking one tour to the other using mattertags.
The below example shows a main space and an annex. Because you can’t get from one to the other without going outside, we’ll actually have to create each of these as a separate tour. Next, we’re going to add a mattertag to each model.
Be aware that you can’t place a mattertag on a 360 external, they can only be placed on the 3D mesh. We can, however, use a 360 external as a destination link for a mattertag.
In the example image we have a Mattertag on the main house with a link to the annex and then we have a Mattertag on the annex with a link back to the main house – in this case we’ve used the 360 external as a destination link when travelling back to the main house (yellow arrow).
Linking up multiple spaces involves three key processes:
Gather your links. Go into each of the tours to set the points where you want each mattertag to land.
Create your mattertags, noting common presentation conventions.
Test your mattertags, and make sure everything is working correctly.
Step by Step Process Pt. 1 – Gathering Links
In our example we’ll link our two tours – a main house and an annex. Start by going into the annex tour.
Choose a scan of the annex that we want to land in when travelling there from the main house, and face the direction you want to be facing when you land there. Next, hit “U” on the keybopard, which brings up a little box up at the top which defines the scan as well as the direction that we were facing:
Click copy to clipboard and then paste into a word processor (any will do). In this case, it’s quite simple. We’re only looking for one link and then a return link, but I would strongly recommend getting into the habit of labelling your URLs as it can get messy and confusing pretty quickly!
Exit the annex tour and open the main house tour where you want to do the same thing. In this case you could use a 360 as a landing point, because 360 externals are really useful at providing some context to the end user, showing themhow they got from one property to another.
Part 2 – Creating the Mattertags
You’ve now gathered your links. Since you’re still in the main house tour, you may as well start creating your mattertags here. Click on the EDIT button in the top right corner and select the tool called “Tags”. Note, this option will be unavailable if you’re on a 360 scan, you need to be on a 3D scan. Click the plus button to create a new tag and drag it into the position you want it on the mesh:
Add a title (eg. “Annex”) and a description, eg “Click here to view the annex”. Ideally we want to embed the URL into the description sentence for a neater presentation. Highlight “Click here” and then click the add link button and paste in the url you saved earlier in your word processing document.
Next you’ll need to go back out of the main house tour and into the annex tour,where you’ll click on EDIT. Create a new mattertag and name it “Main House”, then type “Click here to go back to the main house” into the description. Paste in the url to embed it to “Click here” as described above.
Note: to avoid the ‘fly in’ animation each time you click on the mattertag url, add &qs=1 to the end of the url.
Part 3 – Testing
Now that you have your Mattertags in place you can test them. Open up the main house tour, navigate to the Mattertag, and click to access the annex. Does the link take you there as expected? Is there a return link to get back to the main house and does it work as it should? Check titles and descriptions, and make sure you’ve added “&qs=1” to each URL.
Don’t forget to set both tours to “Unlisted” so the end viewer has full access, and then submit the main house link to the portal.
What is a misaligned scan? It’s a scan that takes you to an unexpected/illogical part of the Matterport tour. Simply put, the software has got confused and placed the scan in the wrong place. Most of the time misaligned scans can be avoided using good scanning practice.
It’s important to look out for misaligned scans whilst capturing a Matterport tour on site. If you notice that a scan has misaligned after it has been processed then you can often fix this using the Matterport realign function.
Matterport guidance on using this function can be found here:
Focal Vieweet account – Your PSM can set this up for you.
How Do I Get VieweetAdded to my Profile?
Submit a trial job of any residential property. You will then receive feedback and be asked to resubmit another trial or signed off and the product can be added to your profile.
What’s involved in capturing a 360 Vieweet?
The end product is a 360 tour which allows easy navigation from room to room and back again. One single panoramic image capture required per room. The entire process is completed using your Ricoh and Vieweet app.
How long does it take?
It depends on the property size but approx. 20 mins for the average 3 bed house
Deleting Vieweet tours from your device makes the URL for the tour inactive so by agreeing to complete Vieweet tours you agree to hold onto the tour for 6 months.
The first step is to extract panoramic images from Matterport – click ‘EDIT’ in the top right corner and go down to the little camera icon along the right hand sidebar, then switch from 2D to pano in the top right and hit the bottom centre camera icon to capture the shot.
When you have all; the shots you want, exit the editor and go to the ‘downloads’ tab to select your images. Matterport will email selected image to you, which can then be downloaded. You don’t need every pano you used in the MP tour, just a central position from each room.
Vieweet
Create a tour in Vieweet (desktop/laptop version) and go to ‘upload images’, then drag and drop the images you extracted from Matterport.
Next, click on “go to studio” and use the “add hotspot” tool to create links.
You’ll be prompted to create return links to ensure any room you link up to has a return link to get back again.
Once you’ve completed your trial job please submit the URL link to the portal. You can do this by clicking the three dots to the right of the Live tours and then Share Tour.
Can I use my Focal Vieweet / Matterport account to process private work?
Yes! We even have a solution for drawing up floorplans too.
Can I subcontract assignments out to others?
Yes, but you take responsibility for ensuring quality meets the required standard and that any sub-contractor meets the minimum requirements for insurance / DBS etc.
I know someone who would like to join. How do they apply?
Absolutely! They can apply through this link: https://www.focalagent.com/become-a-focal-pro/ They will still need to go through the application process but let the Pro Network Team know and we will keep an eye out for the application.
Can I use Focal photos on my own website / social media?
Copyright for photos remains with Focal and caution should be taken when sharing pictures of someone’s home without specific consent for a specific platform. A safe way to share content would be to share a live link (i.e. Rightmove / agent web link etc.)
I’ve received a review which I feel is unfair. What can I do?
Sometimes people make a mistake when leaving a review. Get in touch with your PSM to discuss the details.
Can I convert a Matterport to a Vieweet?
Yes, it’s not ideal as quite time consuming but can be done. Guidance on this can be found here
Can I convert a Vieweet to a Matterport?
No, Matterport tours require multiple scans to be taken using the Matterport capture app so can not be created using any other image capture method.
I have received 2 orders for the same property. Can I use the same photos for 2 different agents?
Ideally no. In this situation then you need to aim to take different shots (even if they are very slightly differing angles) for each agent. If you feel this is not something you are able to do then let us know and we will allocate one of the orders to a different photographer.
I’ve got an order for a reshoot – will I need to do anything different?
Revisit orders are placed with an ‘ORD’ reference number so will differ in appearance. You will also be required to do sample selection on revisits in line with the guidance above.
I’ve been asked to send images over to Focal HQ – what’s the best way to do this.
On the rare occasion we ask you to send us some images direct please COPY the link into an email and send to prosupport@focalagent.com Please don’t send the order directly via the transfer.
I’ve found a previous floorplan online. Can I use this?
As a guide, yes. But it’s worth noting that a large proportion of plans online have errors or have had changes made to the property which are not reflected in the plan. You will need to check all dimensions, add missing dimensions for accuracy (in hallways and irregular shaped rooms) and check all fixtures, fittings and other features such as doors, windows, skylights etc.